> ## Documentation Index
> Fetch the complete documentation index at: https://futureagi.mintlify.site/llms.txt
> Use this file to discover all available pages before exploring further.
# Create & Manage Labels
> Step-by-step guide to creating, editing, duplicating, and archiving annotation labels.
## What it is
Labels are reusable annotation templates that define what you measure. Each label has a type (categorical, numeric, text, star, or thumbs up/down) and type-specific settings. Labels are shared across your entire organization -- any queue can use any label.
## How to create a label
Go to **Annotations** in the left sidebar, then open the **Labels** tab.
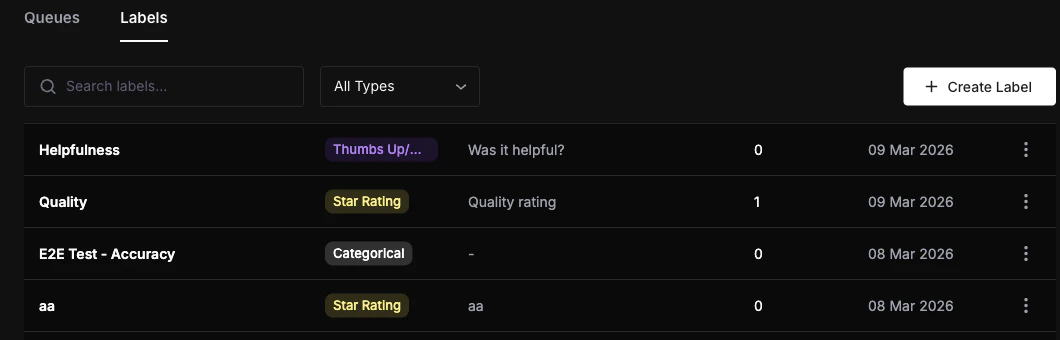 Click the **Create Label** button in the top-right corner of the page.
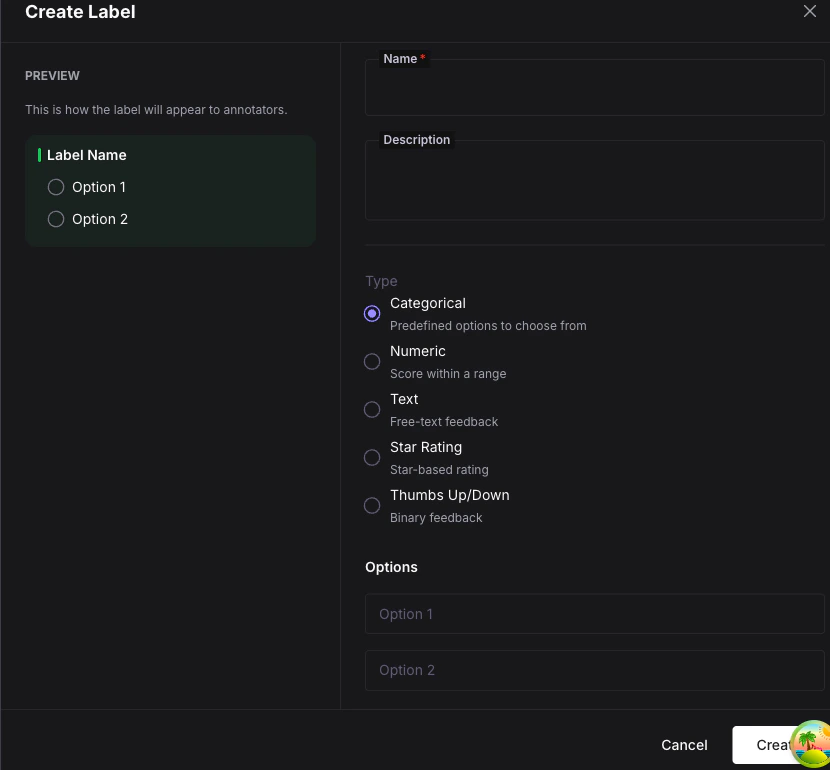
Fill in the **Name** field (required) and an optional **Description** to help annotators understand the label's purpose.
Choose the label **Type**. This cannot be changed after creation, so choose carefully.
Each type has its own configuration options:
* **Categorical** -- Add at least two options. Toggle **Allow multiple selection** if annotators should be able to pick more than one option.
* **Numeric** -- Set **Min**, **Max**, and **Step size** values. Choose the display format: **Slider** or **Buttons**.
* **Text** -- Set **Placeholder text**, **Min character length**, and **Max character length**.
* **Star** -- Set the **Number of stars** (1--10, default 5).
* **Thumbs Up/Down** -- No additional settings needed.
Click the **Create Label** button in the top-right corner of the page.
Fill in the **Name** field (required) and an optional **Description** to help annotators understand the label's purpose.
Choose the label **Type**. This cannot be changed after creation, so choose carefully.
Each type has its own configuration options:
* **Categorical** -- Add at least two options. Toggle **Allow multiple selection** if annotators should be able to pick more than one option.
* **Numeric** -- Set **Min**, **Max**, and **Step size** values. Choose the display format: **Slider** or **Buttons**.
* **Text** -- Set **Placeholder text**, **Min character length**, and **Max character length**.
* **Star** -- Set the **Number of stars** (1--10, default 5).
* **Thumbs Up/Down** -- No additional settings needed.
 Toggle **Allow Notes** if you want annotators to add free-text commentary alongside their label value.
Click **Save**. The label is now available for use in any queue.
## Managing labels
* **Edit** -- Click a label row or use the `⋮` menu and select **Edit**. You can change the name, description, and type-specific settings, but the type itself is immutable.
* **Duplicate** -- Use the `⋮` menu and select **Duplicate**. This creates a copy with the original name prefixed by "Copy of" that you can customize.
* **Archive** -- Use the `⋮` menu and select **Archive**. This soft-deletes the label. Archived labels can be restored.
* **Search** -- Use the search bar at the top to filter labels by name.
* **Filter by type** -- Use the type dropdown to show only labels of a specific type.
## Label type settings reference
| Type | Settings | Default |
| -------------- | ----------------------------------------- | --------------------- |
| Categorical | `options` (list), `multi_choice` (bool) | `multi_choice`: false |
| Numeric | `min`, `max`, `step_size` | 0, 10, 1 |
| Text | `placeholder`, `min_length`, `max_length` | empty string, 0, 5000 |
| Star | `no_of_stars` | 5 |
| Thumbs Up/Down | none | none |
Labels are shared across your entire organization. Any queue can use any label, and changes to a label's settings apply everywhere the label is used.
Start with a few simple labels -- for example, a 5-star quality rating and a categorical sentiment label -- before creating complex ones. You can always duplicate and customize later.
## Next steps
Set up annotation queues that use your labels.
Learn how to use labels in the annotation workspace.
Understand the five label types and when to use each one.
Toggle **Allow Notes** if you want annotators to add free-text commentary alongside their label value.
Click **Save**. The label is now available for use in any queue.
## Managing labels
* **Edit** -- Click a label row or use the `⋮` menu and select **Edit**. You can change the name, description, and type-specific settings, but the type itself is immutable.
* **Duplicate** -- Use the `⋮` menu and select **Duplicate**. This creates a copy with the original name prefixed by "Copy of" that you can customize.
* **Archive** -- Use the `⋮` menu and select **Archive**. This soft-deletes the label. Archived labels can be restored.
* **Search** -- Use the search bar at the top to filter labels by name.
* **Filter by type** -- Use the type dropdown to show only labels of a specific type.
## Label type settings reference
| Type | Settings | Default |
| -------------- | ----------------------------------------- | --------------------- |
| Categorical | `options` (list), `multi_choice` (bool) | `multi_choice`: false |
| Numeric | `min`, `max`, `step_size` | 0, 10, 1 |
| Text | `placeholder`, `min_length`, `max_length` | empty string, 0, 5000 |
| Star | `no_of_stars` | 5 |
| Thumbs Up/Down | none | none |
Labels are shared across your entire organization. Any queue can use any label, and changes to a label's settings apply everywhere the label is used.
Start with a few simple labels -- for example, a 5-star quality rating and a categorical sentiment label -- before creating complex ones. You can always duplicate and customize later.
## Next steps
Set up annotation queues that use your labels.
Learn how to use labels in the annotation workspace.
Understand the five label types and when to use each one.