> ## Documentation Index
> Fetch the complete documentation index at: https://futureagi.mintlify.site/llms.txt
> Use this file to discover all available pages before exploring further.
# Create & Manage Queues
> Step-by-step guide to creating annotation queues, configuring assignment strategies, and managing queue lifecycle.
## What it is
Queues are managed annotation campaigns. They bundle a set of labels, a group of annotators, and a collection of items into a single workflow. Queues track progress, handle assignment, enforce review requirements, and provide analytics.
## How to create a queue
Go to **Annotations** in the left sidebar, then open the **Queues** tab.
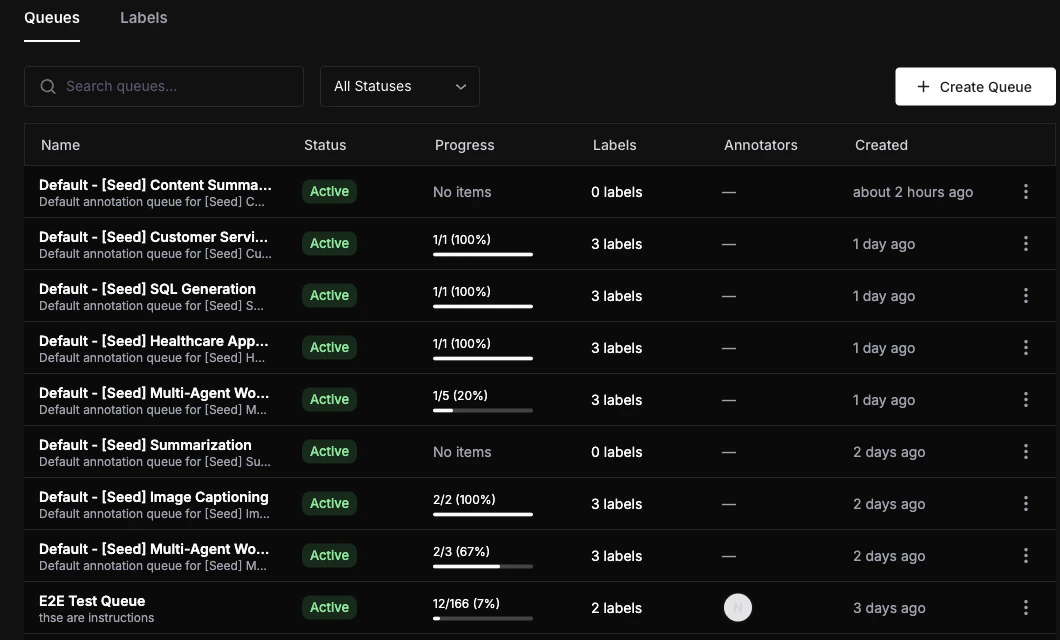 Click the **Create Queue** button to open the creation form.
Fill in the **Name** field (required) and an optional **Description** to help your team understand the queue's purpose.
Select which annotation labels annotators will use when reviewing items in this queue. You can add as many labels as needed.
Click the **Create Queue** button to open the creation form.
Fill in the **Name** field (required) and an optional **Description** to help your team understand the queue's purpose.
Select which annotation labels annotators will use when reviewing items in this queue. You can add as many labels as needed.
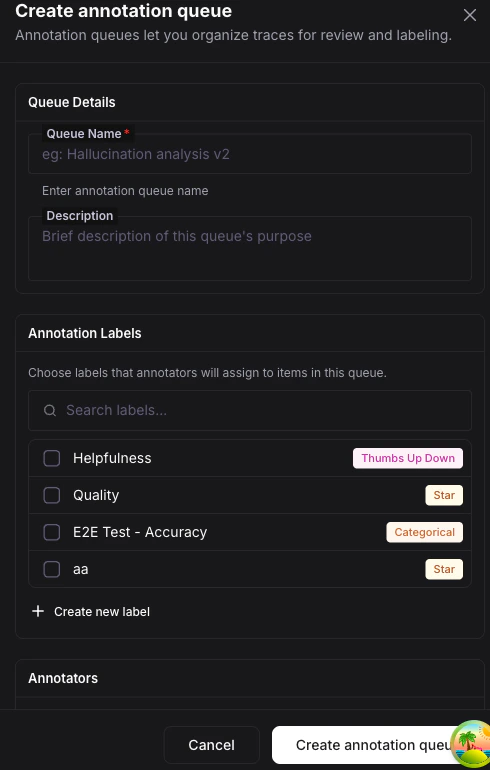 Select workspace members who will annotate items. Only selected members can access and annotate items in this queue.
Expand the **Workflow Settings** section to fine-tune how annotations are handled:
| Setting | Options | Default |
| -------------------- | ---------------------------------- | ------- |
| Annotations Required | 1--10 annotators per item | 1 |
| Assignment Strategy | Manual, Round Robin, Load Balanced | Manual |
| Reservation Timeout | 15 min, 30 min, 1 hour, 4 hours | 30 min |
| Require Review | On / Off | Off |
* **Manual** -- Annotators pick items themselves on a first-come, first-served basis.
* **Round Robin** -- Items are assigned to annotators in rotation.
* **Load Balanced** -- Items are assigned to the annotator with the fewest in-progress items.
* **Reservation Timeout** -- How long an item is locked to an annotator before it becomes available to others.
* **Require Review** -- When enabled, completed annotations are routed to a reviewer before being finalized.
Write markdown-formatted guidelines for annotators. These instructions are shown in a collapsible panel within the annotation workspace, giving annotators context and criteria for their work.
Click **Save**. The queue is created in **Draft** status. You can add items and configure settings before activating it.
## Activating a queue
A newly created queue starts in **Draft** status. To begin accepting annotations:
* From the queue list, use the `⋮` menu and select **Activate**.
* Or open the queue detail page, go to the **Settings** tab, and change the status to **Active**.
## Managing queues
* **Edit** -- Click a queue row to open its detail page, then use the **Settings** tab to modify name, description, labels, annotators, or workflow settings.
* **Duplicate** -- Use the `⋮` menu and select **Duplicate**. Creates a copy in Draft status with the same configuration.
* **Archive** -- Use the `⋮` menu and select **Archive**. Soft-deletes the queue.
* **Search and filter** -- Use the search bar to filter by name and the status dropdown to show only queues with a specific status (All, Draft, Active, Paused, Completed).
## Queue status reference
| Status | Description | Can transition to |
| --------- | ---------------------------------------------------- | ----------------- |
| Draft | Queue is being set up, not yet accepting annotations | Active |
| Active | Annotators can annotate items | Paused, Completed |
| Paused | Temporarily stopped, no new annotations allowed | Active, Completed |
| Completed | All items done or manually completed | Active (re-open) |
When a completed queue receives new items, it automatically transitions back to **Active** status so annotators can continue their work.
## Next steps
Learn how to populate your queue with traces, sessions, dataset rows, and more.
Walk through the annotation workspace and keyboard shortcuts.
Understand assignment strategies and review workflows in depth.
Select workspace members who will annotate items. Only selected members can access and annotate items in this queue.
Expand the **Workflow Settings** section to fine-tune how annotations are handled:
| Setting | Options | Default |
| -------------------- | ---------------------------------- | ------- |
| Annotations Required | 1--10 annotators per item | 1 |
| Assignment Strategy | Manual, Round Robin, Load Balanced | Manual |
| Reservation Timeout | 15 min, 30 min, 1 hour, 4 hours | 30 min |
| Require Review | On / Off | Off |
* **Manual** -- Annotators pick items themselves on a first-come, first-served basis.
* **Round Robin** -- Items are assigned to annotators in rotation.
* **Load Balanced** -- Items are assigned to the annotator with the fewest in-progress items.
* **Reservation Timeout** -- How long an item is locked to an annotator before it becomes available to others.
* **Require Review** -- When enabled, completed annotations are routed to a reviewer before being finalized.
Write markdown-formatted guidelines for annotators. These instructions are shown in a collapsible panel within the annotation workspace, giving annotators context and criteria for their work.
Click **Save**. The queue is created in **Draft** status. You can add items and configure settings before activating it.
## Activating a queue
A newly created queue starts in **Draft** status. To begin accepting annotations:
* From the queue list, use the `⋮` menu and select **Activate**.
* Or open the queue detail page, go to the **Settings** tab, and change the status to **Active**.
## Managing queues
* **Edit** -- Click a queue row to open its detail page, then use the **Settings** tab to modify name, description, labels, annotators, or workflow settings.
* **Duplicate** -- Use the `⋮` menu and select **Duplicate**. Creates a copy in Draft status with the same configuration.
* **Archive** -- Use the `⋮` menu and select **Archive**. Soft-deletes the queue.
* **Search and filter** -- Use the search bar to filter by name and the status dropdown to show only queues with a specific status (All, Draft, Active, Paused, Completed).
## Queue status reference
| Status | Description | Can transition to |
| --------- | ---------------------------------------------------- | ----------------- |
| Draft | Queue is being set up, not yet accepting annotations | Active |
| Active | Annotators can annotate items | Paused, Completed |
| Paused | Temporarily stopped, no new annotations allowed | Active, Completed |
| Completed | All items done or manually completed | Active (re-open) |
When a completed queue receives new items, it automatically transitions back to **Active** status so annotators can continue their work.
## Next steps
Learn how to populate your queue with traces, sessions, dataset rows, and more.
Walk through the annotation workspace and keyboard shortcuts.
Understand assignment strategies and review workflows in depth.